Over-Engineered My Self-Hosting with Kubernetes
Introduction
Too Honest For CV Driven Development
Working at a “Big Tech” company has its perks: because of the scale such company operates at, you typically don’t have to deal with basic services like DNS, authentication or CI/CD as these services are managed by dedicated core teams.
On one hand, it’s great: badly deployed by an overstretched dev or ops guy, these core services can easily become huge time & efficiency sinks distracting us from solving the problems our customers pay us for.
On the other, it can leave gaps in your CV, especially if like me, you have scruples about gratuitously over-engineering things just to learn new tools/frameworks on the job at your employer’s expense.
One such gap I currently have is deploying and managing Kubernetes clusters.
To be honest, I kind of avoided diving into K8s. Maybe it’s an unfounded bias on my part, but Kubernetes always felt a bit overcomplicated, clunky and not very pleasant to manage.
But, well, it’s what the cool kids are doing these days, so here we go.

Is complexity always justified?
What I Wanted Out Of This
By the end of this process, I wanted:
- A mostly automated base KVM hypervisor deployment
- A worker Kubernetes cluster, with all the control plane bits configured
- HTTPS load balancer + DNS
- CI/CD with Argo (and integration with GitHub)
- Docker/Container Registry
This infrastructure should also be managed through the usual “configuration as code” tools, namely Ansible, Tofu, and a bit of scripting. I want to be able to delete and recreate it at will.
I’m making the actual code I’ve used available here in my GitHub. But be aware it is quite tightly coupled to my infrastructure, somewhat badly vibe-coded, and might not be easily reusable.
Kubernetes Basics
Choosing A Kubernetes Distribution
Like chocolate, k8s comes in various flavors. I contemplated deploying it on a traditional distribution, maybe dusting off my Gentoo skills for example.
But finally, I picked the easier path of using a specialized K8S distribution.
I considered the following ones:
Talos Linux is an immutable, API-driven distribution. It has no SSH access, no shell, and everything is configured through declarative configs and the
talosctlCLI.Flatcar Container Linux is a fork of the original CoreOS Container Linux backed by Kinvolk, now part of Microsoft. It’s a minimal and immutable distribution but with SSH access.
OpenShift and Fedora CoreOS are Red Hat’s successors to the original CoreOS.
I ended up choosing Talos Linux. It looked like the most common option on /r/kubernetes, and it’s not linked (yet) to the usual corporate vampires.
Kubernetes Base Architecture
Kubernetes has three main categories of components. First is the Control Plane, which coordinates the cluster. Second are the Workers, i.e. the nodes actually running stuff.
The third and last category is the Cluster Add-Ons, enabling optional (but commonly deployed) things like public DNS record management, load-balancing or audit tools.
In the Control Plane, here are the main components:
- etcd (third party): Consistent and highly-available key value store for all API server data & states.
- kube-apiserver: The core component server that exposes the Kubernetes HTTP API.
- kube-scheduler: Looks for Pods not yet bound to a node, and assigns each Pod (~container execution) to a suitable node.
- kube-controller-manager: Runs the controller loops (replication, namespace, endpoint, etc).
On the Workers, you have:
- kubelet: Ensures that Pods are running, including their containers.
- container runtime (third party): Software responsible for running containers, in our case containerd, but others are possible
And here are some cluster Add-ons we will deploy (non-exhaustive):
- Gateway API (third party): OSI Layer 4 and 7 load balancer to connect our Pods to the outside, here, we will use Traefik, but other implementations are available. It replaces the old Ingress Controllers.
- ExternalDNS (third party): DNS record manager, which integrates with various DNS providers’ APIs (AWS Route53, GCP DNS, OVH, Gandi, RFC2136) and gives names to your exposed services.
Here is how everything fits together (simplified):
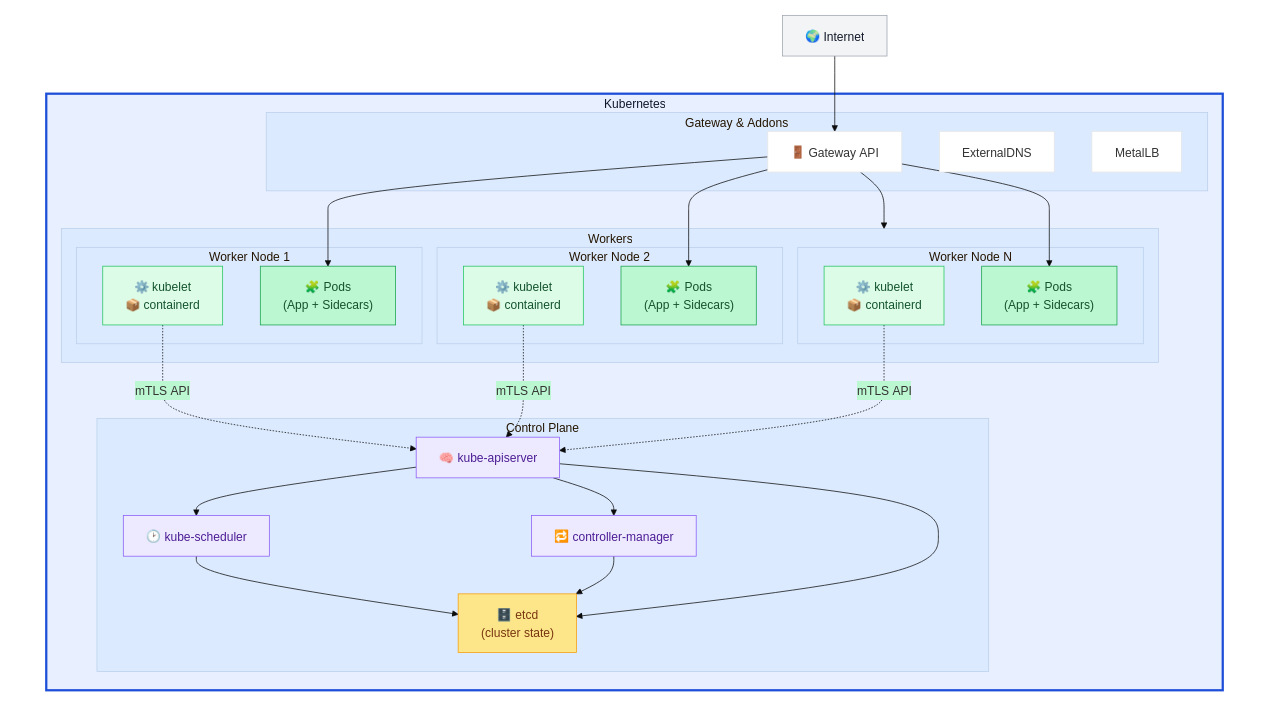
Kubernetes Architecture (simplified)
The cluster components talk to each other using HTTP and gRPC and usually authenticate each other using mutual TLS certificates.
In addition, Talos adds its own components (apid, machined, etc) to configure the cluster and manage its idiosyncrasies (custom init, etc).
Non-K8s Bits
The Metal + A Few Nuts & Bolts
First, there was the recommissioning of my old rig itself (i5 2500k/32GB DDR3) which required a bit of work, like installing some new storage with 3D printed adapters (5.25" to 3.5" + 3.5" to 2.5").
I also did some power consumption optimization (CPU down-clocking, removing/disabling unnecessary cards) to not have the thing draw ~120W continuously. It still draws ~50W however, which is… “not great, not terrible”… (I am considering replacing it with a refurb mini-pc or an old laptop to be honest).
After that, I installed the latest Debian and applied the following Ansible playbook to make a basic hypervisor out of it.
I also deployed an internal DNS server with TSIG/RFC 2136 dynamic zones on a SPARC V100 using OpenBSD for funsies.
And finally, I’ve created a Debian utility VM for support services like a Docker image registry or an LDAP server directory (VM created like in Cloud @Home and configured through this utility.yml Ansible playbook).
Bad Tools, Bad Worker
On our dev machine, we will need a few tools, namely:
- Docker: Build, ship, and run containers.
- OpenTofu (
tofu): Open-source Terraform fork; describes and applies. - kubectl: CLI to administer and debug k8s.
- talosctl: CLI for bootstrapping and operating Talos.
- Helm: “Package Manager” used to install k8s applications and components.
Assuming you are using a deb-based distribution, here is how to install them (if you use macOS, Windows, or OS/2, I leave this exercise to the reader).
docker and kubectl are usually available in Debian/Ubuntu and derivative repositories.
apt install kubectl docker.io
For talosctl, I packaged it in my own repository, but you can directly grab it from Talos releases if you don’t trust me (protip: you shouldn’t):
# Get the architecture and version
. /etc/os-release
ARCH=$(dpkg --print-architecture)
wget -qO - https://kakwa.github.io/misc-pkg/GPG-KEY.pub | gpg --dearmor |sudo tee /etc/apt/keyrings/misc-pkg.gpg >/dev/null
sudo tee /etc/apt/sources.list.d/misc-pkg.sources >/dev/null <<EOF
Types: deb
URIs: https://kakwa.github.io/misc-pkg/deb.${VERSION_CODENAME}.${ARCH}/
Suites: ${VERSION_CODENAME}
Components: main
Signed-By: /etc/apt/keyrings/misc-pkg.gpg
Architectures: ${ARCH}
EOF
apt update

apt install talosctl
OpenTofu publishes tofu packages in their own repository:
curl -fsSL https://get.opentofu.org/opentofu.gpg | gpg --dearmor | sudo tee /etc/apt/keyrings/opentofu.gpg > /dev/null
curl -fsSL https://packages.opentofu.org/opentofu/tofu/gpgkey | gpg --dearmor | sudo tee /etc/apt/keyrings/opentofu-repo.gpg > /dev/null

sudo tee /etc/apt/sources.list.d/opentofu.sources > /dev/null <<EOF
Types: deb
URIs: https://packages.opentofu.org/opentofu/tofu/any/
Suites: any
Components: main
Signed-By: /etc/apt/keyrings/opentofu.gpg /etc/apt/keyrings/opentofu-repo.gpg
EOF
apt update

apt install tofu
And so does Helm:
curl -fsSL https://packages.buildkite.com/helm-linux/helm-debian/gpgkey | gpg --dearmor | sudo tee /etc/apt/keyrings/helm.gpg > /dev/null
sudo tee /etc/apt/sources.list.d/helm-stable-debian.sources > /dev/null <<EOF
Types: deb
URIs: https://packages.buildkite.com/helm-linux/helm-debian/any/
Suites: any
Components: main
Signed-By: /etc/apt/keyrings/helm.gpg
EOF
sudo apt update

sudo apt install helm
Deploy That Damn Cluster Already!
Like the Debian utility VM, I’ve also used Tofu to create the k8s/Talos cluster, except this time, we are “simply” creating nine nodes (3 control plane + 6 workers) instead of one (and I do mean “simply”, the for(each) loop really feels like cheating sometimes).
The full code is available on GitHub and leverages the KVM/libvirt, the Talos and the dns Tofu providers.
Be aware that unlike the Tofu code from Hyperscaler Cloud @Home, it’s more tied to my home network environment, and would need a fair bit of tweaking to run on your setup.
Talos Image Management
Talos has an Image Factory for creating custom images with specific versions, architectures, and extensions.
In my case, I left it nearly vanilla, but you can add things if you have special needs, for example, completely at random in these AI days, NVIDIA drivers for CUDA workloads.
To get the list of customization/versions, simply go through the form and grab the generated schematic at the end.
The schematic can be used to configure and download the Talos image in the Tofu provider, and register it in Libvirt:
# Create a schematic with custom extensions
resource "talos_image_factory_schematic" "this" {
  schematic = yamlencode({
    customization = {
      systemExtensions = {
        officialExtensions = [
          "siderolabs/binfmt-misc",
        ]
      }
    }
  })
}

# Build the image URL from the schematic
locals {
  talos_version   = "v1.12.6"
  talos_image_url = "https://factory.talos.dev/image/${talos_image_factory_schematic.this.id}/${local.talos_version}/nocloud-amd64.qcow2"
}

# Download the image directly into libvirt
resource "libvirt_volume" "talos_base" {
  name = "talos-base.qcow2"
  pool = "mid-pool"
  create = {
    content = {
      url = local.talos_image_url
    }
  }
  target = {
    format = { type = "qcow2" }
  }
}
Cluster Network
It’s not k8s, but we need a network for our cluster.
Let’s create one quickly, behind a NAT and with DHCP:
resource "libvirt_network" "talos_network" {
  name      = "talos-network"
  autostart = true
  forward   = { mode = "nat" }
  bridge = {
    name  = "virbr1"
    stp   = "on"
    delay = "0"
  }
  ips = [{
    address  = "192.168.100.1"
    netmask  = "255.255.255.0"
    dhcp = {
      ranges = [{
        start = "192.168.100.50"
        end   = "192.168.100.254"
      }]
    }
  }]
}
Control Plane Nodes
Our Kubernetes control plane will use 3 nodes with the minimal Talos specs, i.e. 2 cores+2GB RAM as we are fairly limited in space here.
For resiliency in production, this number is usually increased to 5. On paper this could be further increased to any odd value, but at the cost of latency. Underneath all that, the cluster states are backed by the raft-based, strongly consistent, etcd key/value store, which explains this behavior.
Here is the definition of the nodes:
locals {
  control_plane_nodes = {
    for i in range(3) : "talos-cp-${i + 1}" => {
      memory_mb = 2048
      vcpu      = 2
    }
  }
}
To bootstrap the nodes, in particular the network configuration, we need to pass a few cloud-init parameters, which we can create with the libvirt_cloudinit_disk resource from the libvirt Tofu provider:
resource "libvirt_cloudinit_disk" "cp_seed" {
  for_each = local.control_plane_nodes

  name = "${each.key}-cloudinit"
  user_data = <<-EOF
    timezone: UTC
  EOF
  meta_data = <<-EOF
    instance-id: ${each.key}
    local-hostname: ${each.key}
  EOF
  network_config = <<-EOF
    version: 2
    ethernets:
      eth0:
        dhcp4: true
  EOF
}

# Convert cloud-init to ISO volume
resource "libvirt_volume" "cp_seed_volume" {
  for_each = local.control_plane_nodes
  name = "${each.key}-cloudinit.iso"
  pool = "slow-pool"
  create = {
    content = {
      url = "file://${libvirt_cloudinit_disk.cp_seed[each.key].path}"
    }
  }
}
We also need some disks for our nodes, using the Talos image as a base:
# Each node gets its own disk backed by the base image
resource "libvirt_volume" "cp_disk" {
  for_each = local.control_plane_nodes

  name     = "${each.key}-disk.qcow2"
  pool     = "mid-pool"
  capacity = 107374182400 # 100GB
  backing_store = {
    path   = libvirt_volume.talos_base.path
    format = { type = "qcow2" }
  }
  target = {
    format = { type = "qcow2" }
  }
}
And finally, we can create the VMs themselves, reusing these disks:
resource "libvirt_domain" "control_plane" {
  for_each = local.control_plane_nodes

  name      = each.key
  memory    = each.value.memory_mb * 1024
  vcpu      = each.value.vcpu
  running   = true
  autostart = true

  os = {
    type         = "hvm"
    type_arch    = "x86_64"
    type_machine = "q35"
  }

  cpu = {
    mode = "host-passthrough"
  }

  devices = {
    disks = [
      {
        source = {
          volume = {
            pool   = libvirt_volume.cp_disk[each.key].pool
            volume = libvirt_volume.cp_disk[each.key].name
          }
        }
        target = { dev = "vda", bus = "virtio" }
        driver = { type = "qcow2" }
      },
      {
        device = "cdrom"
        source = {
          volume = {
            pool   = "slow-pool"
            volume = "${each.key}-cloudinit.iso"
          }
        }
        target = { dev = "sda", bus = "sata" }
      }
    ]
    interfaces = [
      {
        type  = "network"
        model = { type = "virtio" }
        source = {
          network = {
            network = libvirt_network.talos_network.name
          }
        }
        wait_for_ip = { timeout = 300, source = "any" }
      }
    ]
  }
}
Worker Nodes
Similarly, we will deploy 6 nodes which will be used as workers.
Here is a rough outline of the code, but since it’s mostly identical to the control plane, this is a cut down version of the code as it’s just more of the same:
locals {
  worker_nodes = {
    for i in range(6) : "talos-worker-${i + 1}" => {
      [...]
    }
  }
}

resource "libvirt_cloudinit_disk" "worker_seed" {
  for_each = local.worker_nodes
  name = "${each.key}-cloudinit"
  [...]
}

# Convert cloud-init to ISO volume
resource "libvirt_volume" "worker_seed_volume" {
  for_each = local.worker_nodes
  name = "${each.key}-cloudinit.iso"
  [...]
}

# main worker VM disks
resource "libvirt_volume" "worker_disk" {
  for_each = local.worker_nodes
  [...]
}

resource "libvirt_domain" "workers" {
  for_each = local.worker_nodes
  [...]
}
Remember Remember, The IPs Of Our Cluster
Once we have our VMs, it would be nice to not have to go fishing for the IPs of our cluster nodes.
So, through a simple template like:
export CONTROL_PLANE_IP=(${join(" ", [for ip in control_plane_ips : "${"\""}${ip}${"\""}"])})
export WORKER_IP=(${join(" ", [for ip in worker_ips : "${"\""}${ip}${"\""}"])})
export CONTROL_PLANE_VIP="${control_plane_vip}"
And a bit of OpenTofu code leveraging the data.libvirt_domain_interface_addresses Tofu datasource:
# Recovery of the IPs
# might need some modification (FIXME hard coded indices are sketchy)
locals {
  provider_talos_cp_ips = {
    for k in keys(local.control_plane_nodes) :
    k => try(data.libvirt_domain_interface_addresses.control_plane[k].interfaces[1].addrs[0].addr, "")
  }
  talos_worker_ips = {
    for k in keys(local.worker_nodes) :
    k => try(data.libvirt_domain_interface_addresses.workers[k].interfaces[1].addrs[0].addr, "")
  }
}

# We also define a VIP for the cluster, to more easily access it in the future.
variable "control_plane_vip" {
  description = "Virtual IP for the Talos/Kubernetes control plane API"
  type        = string
  default     = "192.168.100.10"
}

# Use the template and the IPs to generate the talos-env.sh inventory file
resource "local_file" "env" {
  content = templatefile("${path.module}/env.tpl", {
    control_plane_ips      = local.provider_talos_cp_ips
    worker_ips             = local.talos_worker_ips
    control_plane_vip      = var.control_plane_vip
  })
  filename        = ".//talos-env.sh"
  file_permission = "0644"
}
We can let Tofu create an env file which once sourced, will provide convenient variables for the rest of this setup.
At Last, Kubernetes & Talos Setup
After a while, you should have a bunch of new VMs, booted-up into an unconfigured Talos.
If you use virt-manager, you should see a dashboard like that in the first tty of each VM:
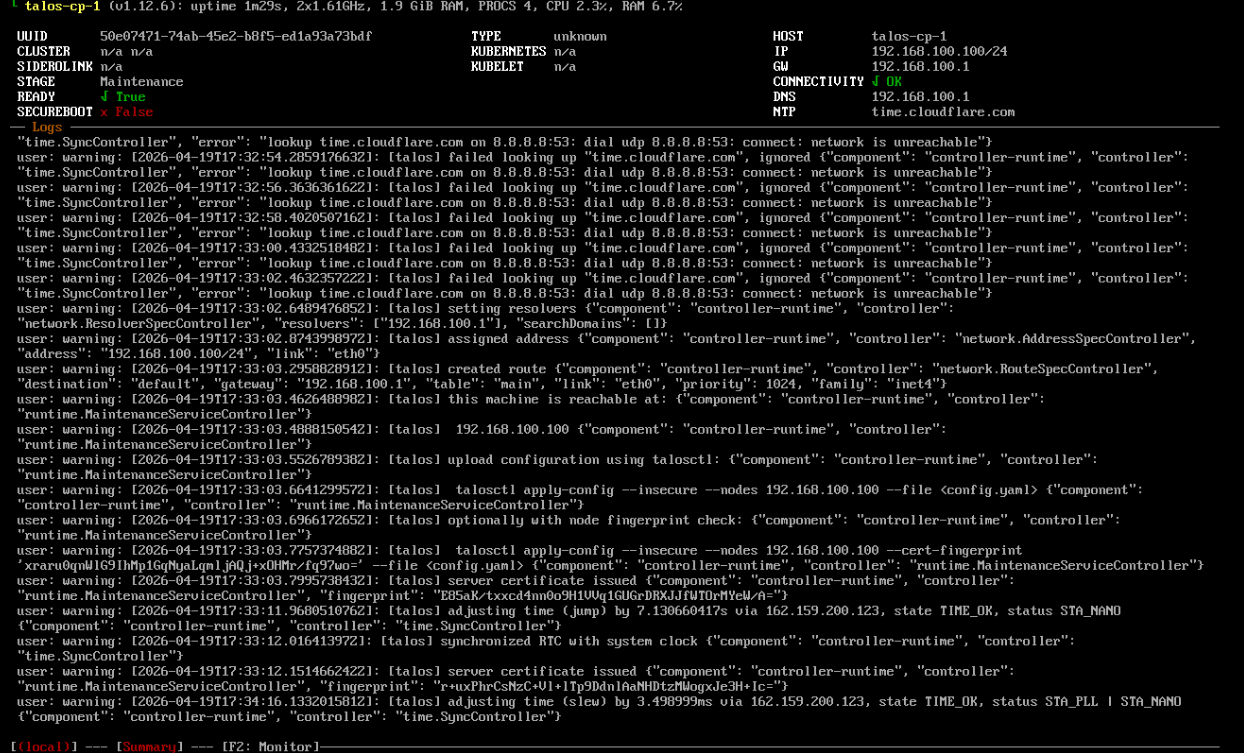
Fresh Talos VM in maintenance mode before apply-config
Note that on all nodes, currently, Type is unknown, Stage is Maintenance, Cluster and various other parameters are n/a.
This means that right now, we have just a bunch of individual nodes not talking to each other.
Also note that the cluster is in a vulnerable state at this point, with anybody able to take control of your freshly provisioned nodes.
We must configure all the nodes in order to have a properly functioning and secured k8s cluster.
Generating The Cluster Config
So, the first step is to generate a configuration auto-magically using talosctl gen config
# Set some variables
source ./talos-env.sh
CLUSTER_NAME="kakwalab-talos-cluster"
BOOTSTRAP_CP="${CONTROL_PLANE_IP[0]}"
TEMP_ENDPOINT="https://${BOOTSTRAP_CP}:6443"

talosctl gen config "${CLUSTER_NAME}" "${TEMP_ENDPOINT}"
This creates a base configuration consisting of controlplane.yaml, worker.yaml, and talosconfig.
And for the most part, these mainly serve to create mTLS key pairs (the Certificate Authority) for authentication. And they also configure some internal network stuff for the cluster.
Configuration bootstrapping
Apply the generated config to all nodes (control planes first, then workers), then bootstrap the cluster once:
# If not already done
source ./talos-env.sh

# Apply control planes configuration
for ip in "${CONTROL_PLANE_IP[@]}"; do
  talosctl apply-config --insecure --nodes "${ip}" --file controlplane.yaml
done

# Apply workers configuration
for ip in "${WORKER_IP[@]}"; do
  talosctl apply-config --insecure --nodes "${ip}" --file worker.yaml
done

# Wait for nodes to come back up
sleep 120

# Bootstrap (only once, on the first control plane)
talosctl bootstrap --endpoints "${BOOTSTRAP_CP}" --nodes "${BOOTSTRAP_CP}"
While nodes restart and synchronize after apply-config, the nodes could stay in booting state for a few minutes:

Worker node still coming up after configuration
After the bootstrap, check the cluster health, and fetch the kubeconfig file for kubectl once it’s healthy:
talosctl health --endpoints "${BOOTSTRAP_CP}" --nodes "${BOOTSTRAP_CP}" \
  --control-plane-nodes "$(IFS=,; echo "${CONTROL_PLANE_IP[*]}")" \
  --worker-nodes "$(IFS=,; echo "${WORKER_IP[*]}")" \
  --wait-timeout 5m

talosctl kubeconfig . --endpoints "${BOOTSTRAP_CP}" --nodes "${BOOTSTRAP_CP}"
On a control plane node TTY, a healthy dashboard looks like this:

Healthy control plane after bootstrap
Workers should show a similar status in the dashboard:

Healthy worker node
From there, you should be able to run kubectl, and see your cluster:
export KUBECONFIG=$(pwd)/kubeconfig

kubectl get nodes

NAME             STATUS   ROLES           AGE   VERSION
talos-cp-1       Ready    control-plane   65m   v1.35.0
talos-cp-2       Ready    control-plane   65m   v1.35.0
talos-cp-3       Ready    control-plane   65m   v1.35.0
talos-worker-1   Ready    <none>          64m   v1.35.0
talos-worker-2   Ready    <none>          64m   v1.35.0
talos-worker-3   Ready    <none>          64m   v1.35.0
talos-worker-4   Ready    <none>          64m   v1.35.0
talos-worker-5   Ready    <none>          64m   v1.35.0
talos-worker-6   Ready    <none>          64m   v1.35.0
VIP for kubectl
It’s optional, but let’s add a virtual IP on the control plane nodes to ease management.
First, let’s patch the control plane node configuration to use this VIP:
for ip in "${CONTROL_PLANE_IP[@]}"; do
  talosctl patch mc --endpoints "${ip}" --nodes "${ip}" --patch "
machine:
  network:
    interfaces:
      - interface: eth0
        dhcp: true
        vip:
          ip: ${CONTROL_PLANE_VIP}
"
done
After VIP election, we can then set the control plane endpoint to it.
for ip in "${CONTROL_PLANE_IP[@]}"; do
  talosctl patch mc --endpoints "${ip}" --nodes "${ip}" --patch "
cluster:
  controlPlane:
    endpoint: https://${CONTROL_PLANE_VIP}:6443
"
done
And grab an updated kubeconfig
talosctl kubeconfig . --endpoints "${BOOTSTRAP_CP}" --nodes "${BOOTSTRAP_CP}"
(Not So) Optional Kubernetes Add-Ons
MetalLB
In the cloud, Kubernetes leverages the providers’ load balancer services such as NLB on AWS. But that is not something we have at home.
MetalLB fills that gap for on-premises deployments. In a simple deployment, it watches LoadBalancer services and assigns addresses from a pool you define to be used by said LoadBalancer services.
First we need a bit of configuration to tweak the MetalLB namespace permissions (aka PSS/PSA or Pod Security Standards).
metallb-namespace.yaml:
# PSA: MetalLB speaker/FRR need NET_ADMIN, hostNetwork, etc. — not compatible with restricted.
apiVersion: v1
kind: Namespace
metadata:
  name: metallb
  labels:
    pod-security.kubernetes.io/enforce: privileged
    pod-security.kubernetes.io/audit: privileged
    pod-security.kubernetes.io/warn: privileged
And from there, we need to declare the range of IPs we let MetalLB to play with:
metallb-lan.yaml
# Apply after the MetalLB Helm release is healthy. Namespace must match the chart install.
apiVersion: metallb.io/v1beta1
kind: IPAddressPool
metadata:
  name: lan-pool
  namespace: metallb
spec:
  addresses:
    - 192.168.1.48/28 # Modify with your own IPs (be cautious about collision, especially with DHCP ranges)
---
apiVersion: metallb.io/v1beta1
kind: L2Advertisement
metadata:
  name: lan-pool-l2
  namespace: metallb
spec:
  ipAddressPools:
    - lan-pool
export KUBECONFIG="$(pwd)/kubeconfig"
export METALLB_NAMESPACE="metallb"

kubectl apply -f ./metallb-namespace.yaml

helm repo add metallb https://metallb.github.io/metallb --force-update
helm repo update metallb
helm upgrade --install metallb metallb/metallb --namespace "$METALLB_NAMESPACE"

kubectl rollout status deployment/metallb-controller -n "$METALLB_NAMESPACE" --timeout=300s
kubectl rollout status daemonset/metallb-speaker -n "$METALLB_NAMESPACE" --timeout=300s

kubectl apply -f ./metallb-lan.yaml
Traefik Deployment
On top of MetalLB we can now deploy Traefik, which will handle our load balancing needs, both of TCP/UDP and HTTP directly.
We also need some permissions on the Traefik namespace, which we will set with a bit of YAML:
traefik-namespace.yaml:
# PSA baseline: avoids restricted seccomp warnings on Traefik controller without full privileged.
apiVersion: v1
kind: Namespace
metadata:
  name: traefik
  labels:
    pod-security.kubernetes.io/enforce: baseline
    pod-security.kubernetes.io/audit: baseline
    pod-security.kubernetes.io/warn: baseline
And from there, we configure a fairly generic Helm values for Traefik:
traefik-helm-values.yaml:
# Traefik as cluster ingress (Ingress + IngressRoute CRD).
ingressClass:
  enabled: true
  isDefaultClass: true

service:
  annotations:
    metallb.universe.tf/address-pool: lan-pool
  spec:
    type: LoadBalancer

providers:
  kubernetesCRD:
    enabled: true
  kubernetesIngress:
    enabled: true
    # Fill Ingress status.loadBalancer so ExternalDNS (and clients) see the Traefik LB IP/hostname.
    publishedService:
      enabled: true
      pathOverride: traefik/traefik

deployment:
  replicas: 1
We can then use these to create the Traefik namespace:
export KUBECONFIG="./kubeconfig"
export TRAEFIK_NAMESPACE="traefik"

kubectl apply -f ./traefik-namespace.yaml
And finally add the Helm chart repository and install or upgrade Traefik:
helm repo add traefik https://traefik.github.io/traefik-helm-chart --force-update
helm repo update traefik

helm upgrade --install traefik traefik/traefik \
  --namespace "$TRAEFIK_NAMESPACE" \
  -f ./traefik-helm-values.yaml
After the controller is up, check that the load balancer received an address from your pool:
kubectl -n "$TRAEFIK_NAMESPACE" get svc
From there, standard Ingress objects with ingressClassName: traefik (and optional Traefik annotations) are what connect hostnames to workloads—exactly what the first application chart below relies on.
DNS Management (ExternalDNS)
Thanks to Traefik, we have exposed and load-balanced our service, but usually you also want to give it names in DNS. While it could be managed separately from Kubernetes, it is nicer to have the cluster own those records and declare the desired hostname next to the Ingress in Helm. The usual tool for that is ExternalDNS, which can integrate with many DNS providers (Route53, Gandi, OVH, and so on).
In my case, I use the generic RFC2136/TSIG integration to let it manage records in a private int.kakwalab.ovh zone.
To enable ExternalDNS, start from a Helm values template with the parameters your server needs (zone name, key algorithm, DNS server IP and port, and so on):
provider:
  name: rfc2136

#  Replace with your DNS server
extraArgs:
  - --rfc2136-host=192.168.1.25
  - --rfc2136-port=5353
  - --rfc2136-zone=int.kakwalab.ovh
  - --rfc2136-tsig-secret-alg=hmac-sha512

env:
  - name: EXTERNAL_DNS_RFC2136_TSIG_SECRET
    valueFrom:
      secretKeyRef:
        name: external-dns-rfc2136
        key: rfc2136-tsig-secret
  - name: EXTERNAL_DNS_RFC2136_TSIG_KEYNAME
    valueFrom:
      secretKeyRef:
        name: external-dns-rfc2136
        key: rfc2136-tsig-keyname

txtOwnerId: talos-home-tf

#  Replace with your DNS zone
domainFilters:
  - int.kakwalab.ovh

sources:
  - service
  - ingress

policy: upsert-only

logLevel: info
interval: 1m

rbac:
  create: true

resources:
  requests:
    cpu: 50m
    memory: 64Mi
  limits:
    memory: 128Mi
From there, prepare a namespace and a secret with your TSIG key:
export KUBECONFIG="./kubeconfig"

export EXTERNAL_DNS_NAMESPACE="external-dns"

# TSIG credentials (replace with your own)
DNS_TSIG_KEY_SECRET="LTEzODcyLTE0NzIxCgLTEzODcyLTE0NzIxCgLTEzODcyLTE0NzIxCgQ=="
TSIG_KEYNAME="sec1_key"

# Create namespace for ExternalDNS
kubectl create namespace "$EXTERNAL_DNS_NAMESPACE" --dry-run=client -o yaml | kubectl apply -f -

# Create the service secrets
kubectl -n "$EXTERNAL_DNS_NAMESPACE" create secret generic external-dns-rfc2136 \
  --from-literal=rfc2136-tsig-secret="$DNS_TSIG_KEY_SECRET" \
  --from-literal=rfc2136-tsig-keyname="$TSIG_KEYNAME" \
  --dry-run=client -o yaml | kubectl apply -f -
And install with Helm:
# Add Helm Repository
helm repo add external-dns https://kubernetes-sigs.github.io/external-dns/ >/dev/null
helm repo update external-dns >/dev/null

# Install it, using the upstream helm template and our configuration
helm upgrade --install external-dns external-dns/external-dns \
  --namespace "$EXTERNAL_DNS_NAMESPACE" \
  -f "./external-dns-helm-values.yaml"
A Few Closing Items
Deploying A Private Docker Registry
To store and distribute our app container image, I’ve also deployed a private Docker Registry on the utility VM.
The deployment is done through this Ansible docker_registry/ role.
The gist being that it deploys a docker-registry package I’ve built, configures plus enables the service and puts an nginx in front of it for Auth Basic and TLS.
For TLS, it uses a proper Let’s Encrypt certificate as loading a custom, self-signed, CA in Talos seems tedious.
As it’s a non-public service, the certificate was obtained using the DNS-01 challenge with certbot’s OVH plugin (my DNS provider).
For our app, this is where our Kubernetes cluster will download its container images
Our First App!
Now that we have a cluster and its surrounding infrastructure, let’s finally do something useful.
As it happened to be, I was getting a bit annoyed by the prevalence of AI posts in my Hacker News RSS feed.
Through a bit of Q&D vibe-coding on hnrss doing some keyword matching (words like ai, llm, anthropic…), I’ve created a fork adding /ai and /noai endpoints separating AI and non AI content.
This filtering works great, but now, we must host this thing, and well… we have a brand new Kubernetes cluster.
This service is actually kind of ideal for k8s since it doesn’t have a persistent layer.
In addition to the filtering mods, I’ve added the bits necessary for Kubernetes, namely:
- a Dockerfile to create a container,
- a small script to publish our container image into our registry
- a minimal Helm Chart
To deploy it on our cluster, do the following.
Clone the repository and enter it:
git clone https://github.com/kakwa/hnrss-ai-filtering.git
cd hnrss-ai-filtering
Set a few env vars for docker and kubectl/helm:
export REGISTRY_USER=R_USER
export REGISTRY_PASSWORD=R_PASSWORD
export REGISTRY_HOST=registry.example.com
export REGISTRY=${REGISTRY_HOST}
export KUBECONFIG=$HOME/.kubeconfig
Publishing a new version of the docker image in our registry:
./scripts/publish-image.sh
Creating or updating the service definition:
# Create a namespace for the service (if necessary)
kubectl create namespace hnrss

# Go and tweak the helm configuration
cd helm/
vim values.yaml # in particular, tweak the DNS domain.

# Apply helm configuration (creation and updates)
helm upgrade --install hnrss ./ --namespace hnrss --set registryAuth.password="$REGISTRY_PASSWORD"
Rolling out a new version after publishing in the docker registry:
kubectl rollout restart deployment -n hnrss
Conclusion
So, was this exercise worth it?
… Well… kind of… but not completely.
For my personal stuff, I’m much more in the “just use a VPS” camp. Just to illustrate, the hnrss app took me 15 minutes to deploy on my VPS. In k8s, with all the Helm template and Docker stuff, it was closer to two hours (granted, I was also fixing the last cluster setup issues).
In a professional context, while I do appreciate what K8s brings (clean decoupling between infrastructure and app + easy instrumentation enabling stuff like CI/CD), I just want to remain being a user of the thing, not administer it.
I like things often considered boring, LDAP and IAM topics for example, but here, I think I’ve reached my limits. There are simply too many moving pieces and too much magic glue going on. Kubernetes does solve problems, but it really feels like a tedious and clunky solution. To the point I’m wondering if something a bit more opinionated, complete out of the box and simpler will not pop-up and replace it in the future.
Just to illustrate, this already lengthy deployment is in fact far from complete. From the goals I set out at the beginning, I’m still missing the CI/CD part (for example ArgoCD). And beyond that, there are many other subjects which would need to be tackled in a production & non-solo environment:
- RBAC and access control, like described in Kubernetes RBAC and authentication (OIDC, webhooks, group claims).
- Management UI, for example Headlamp
- Monitoring, probably levering Prometheus
- Logging: probably leveraging Fluentd for log forwarding, and either Elasticsearch or ClickHouse for indexing.
- Persistent volumes, could for example leverage iSCSI volumes
- Project templates
But it was not lost time either. Even if right now, I’m kind of fed up with it, I will probably revisit it in the future and do the CI/CD stuff (easily bootstrapping a new service is simply too appealing).
It also gave me an appreciation for Kubernetes operators. Now I get why it’s a specialized and hard-to-fill role.
And lastly, discovering what you want and don’t want to do before fully committing to it is always valuable. Managing Kubernetes clusters all day long is simply not for me.
Relevant Links
- Kubernetes Documentation: The star of the show.
- Talos Linux: API-driven, immutable OS for Kubernetes.
- Talos Documentation: Official documentation for Talos.
- Talos Image Factory: Custom Talos images builder.
- OpenTofu: Open-source infrastructure as code tool (Terraform Fork).
- kubectl: CLI tool for k8s administration.
- Helm: “package manager” & service specification for k8s
- OpenTofu libvirt provider: KVM/libvirt provider for Tofu.
- OpenTofu Talos provider: Talos provider for Tofu.
- MetalLB: K8S On-prem IPs management add-on for supporting LoadBalancer.
- Traefik: K8S LoadBalancer/Service Gateway add-on.
- ExternalDNS: K8S add-ons to manage DNS records.
- Argo CD: GitOps continuous delivery for K8S applications.
- Headlamp: Management UI for K8s.
- Fluentd: Unified logging layer.
- home.tf: The Ansible and OpenTofu code used in this article.