My Silly Sun Server - Part 3/3: The Software
The Software Side
In Part 1/3 (intro) and Part 2/3 (hardware), we dealt with the hardware side, and rebuilt our cute V100 into a more manageable format.
Now it’s time to resuscitate this server.
For that we will need to interact with the server’s firmware (LOMlite2 & Open Firmware), set up a netboot server, install a usable OS, and finally, configure some services.
LOMlite2
Presentation
LOM stands for Lights Out Management. It fulfills the same role as IPMI compatible devices.
It’s a small Baseboard Management Controller (BMC), similar to HP’s iLO or Dell’s iDRAC, monitoring the hardware (fans, PSUs), setting the boot sequence, and of course, turning it off and on again.
On this V100, we have the LOMlite2 version, which is only accessible through serial (bigger & newer servers, like V210s or T2000s, have ALOM & ILOM with network & telnet/SSH capabilities).
Serial Cabling
To access LOM, you need one of these blue ‘Cisco’ cables with DB9 + RJ45 connectors and a serial adapter:
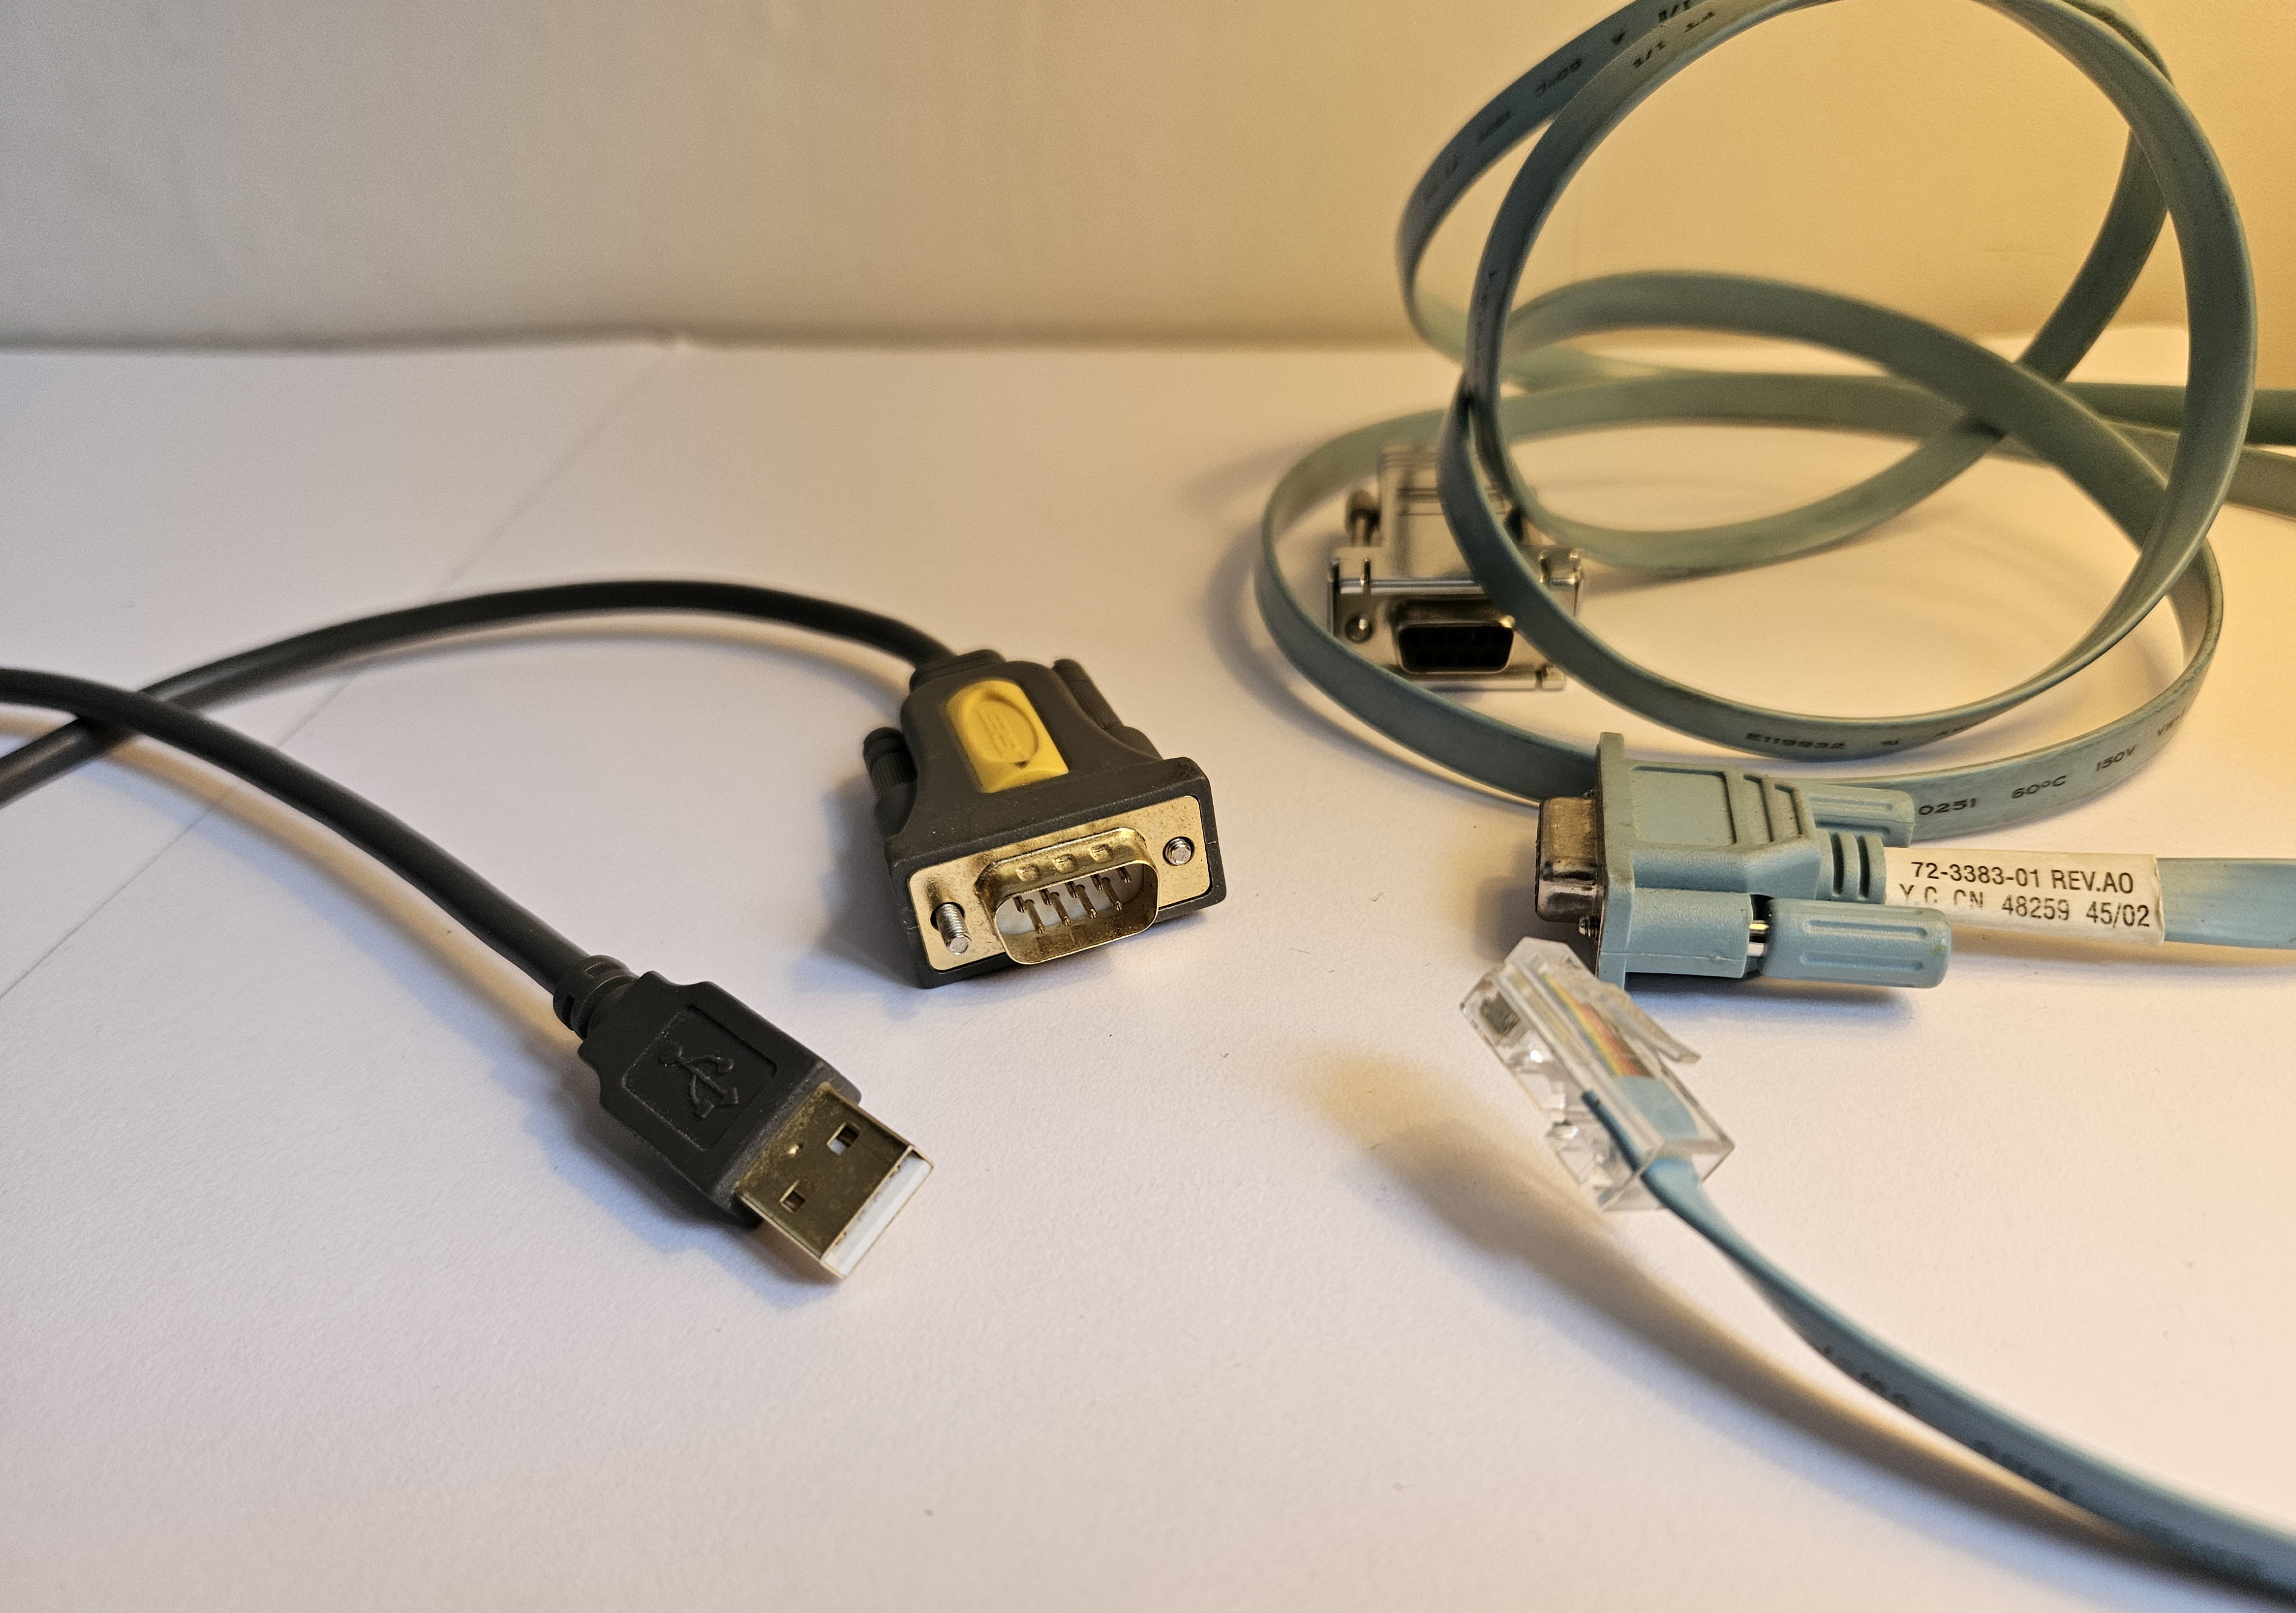
Blue Cisco console cable with USB serial adapter
Connect it to the upper port on the server, and use your favorite serial terminal software.
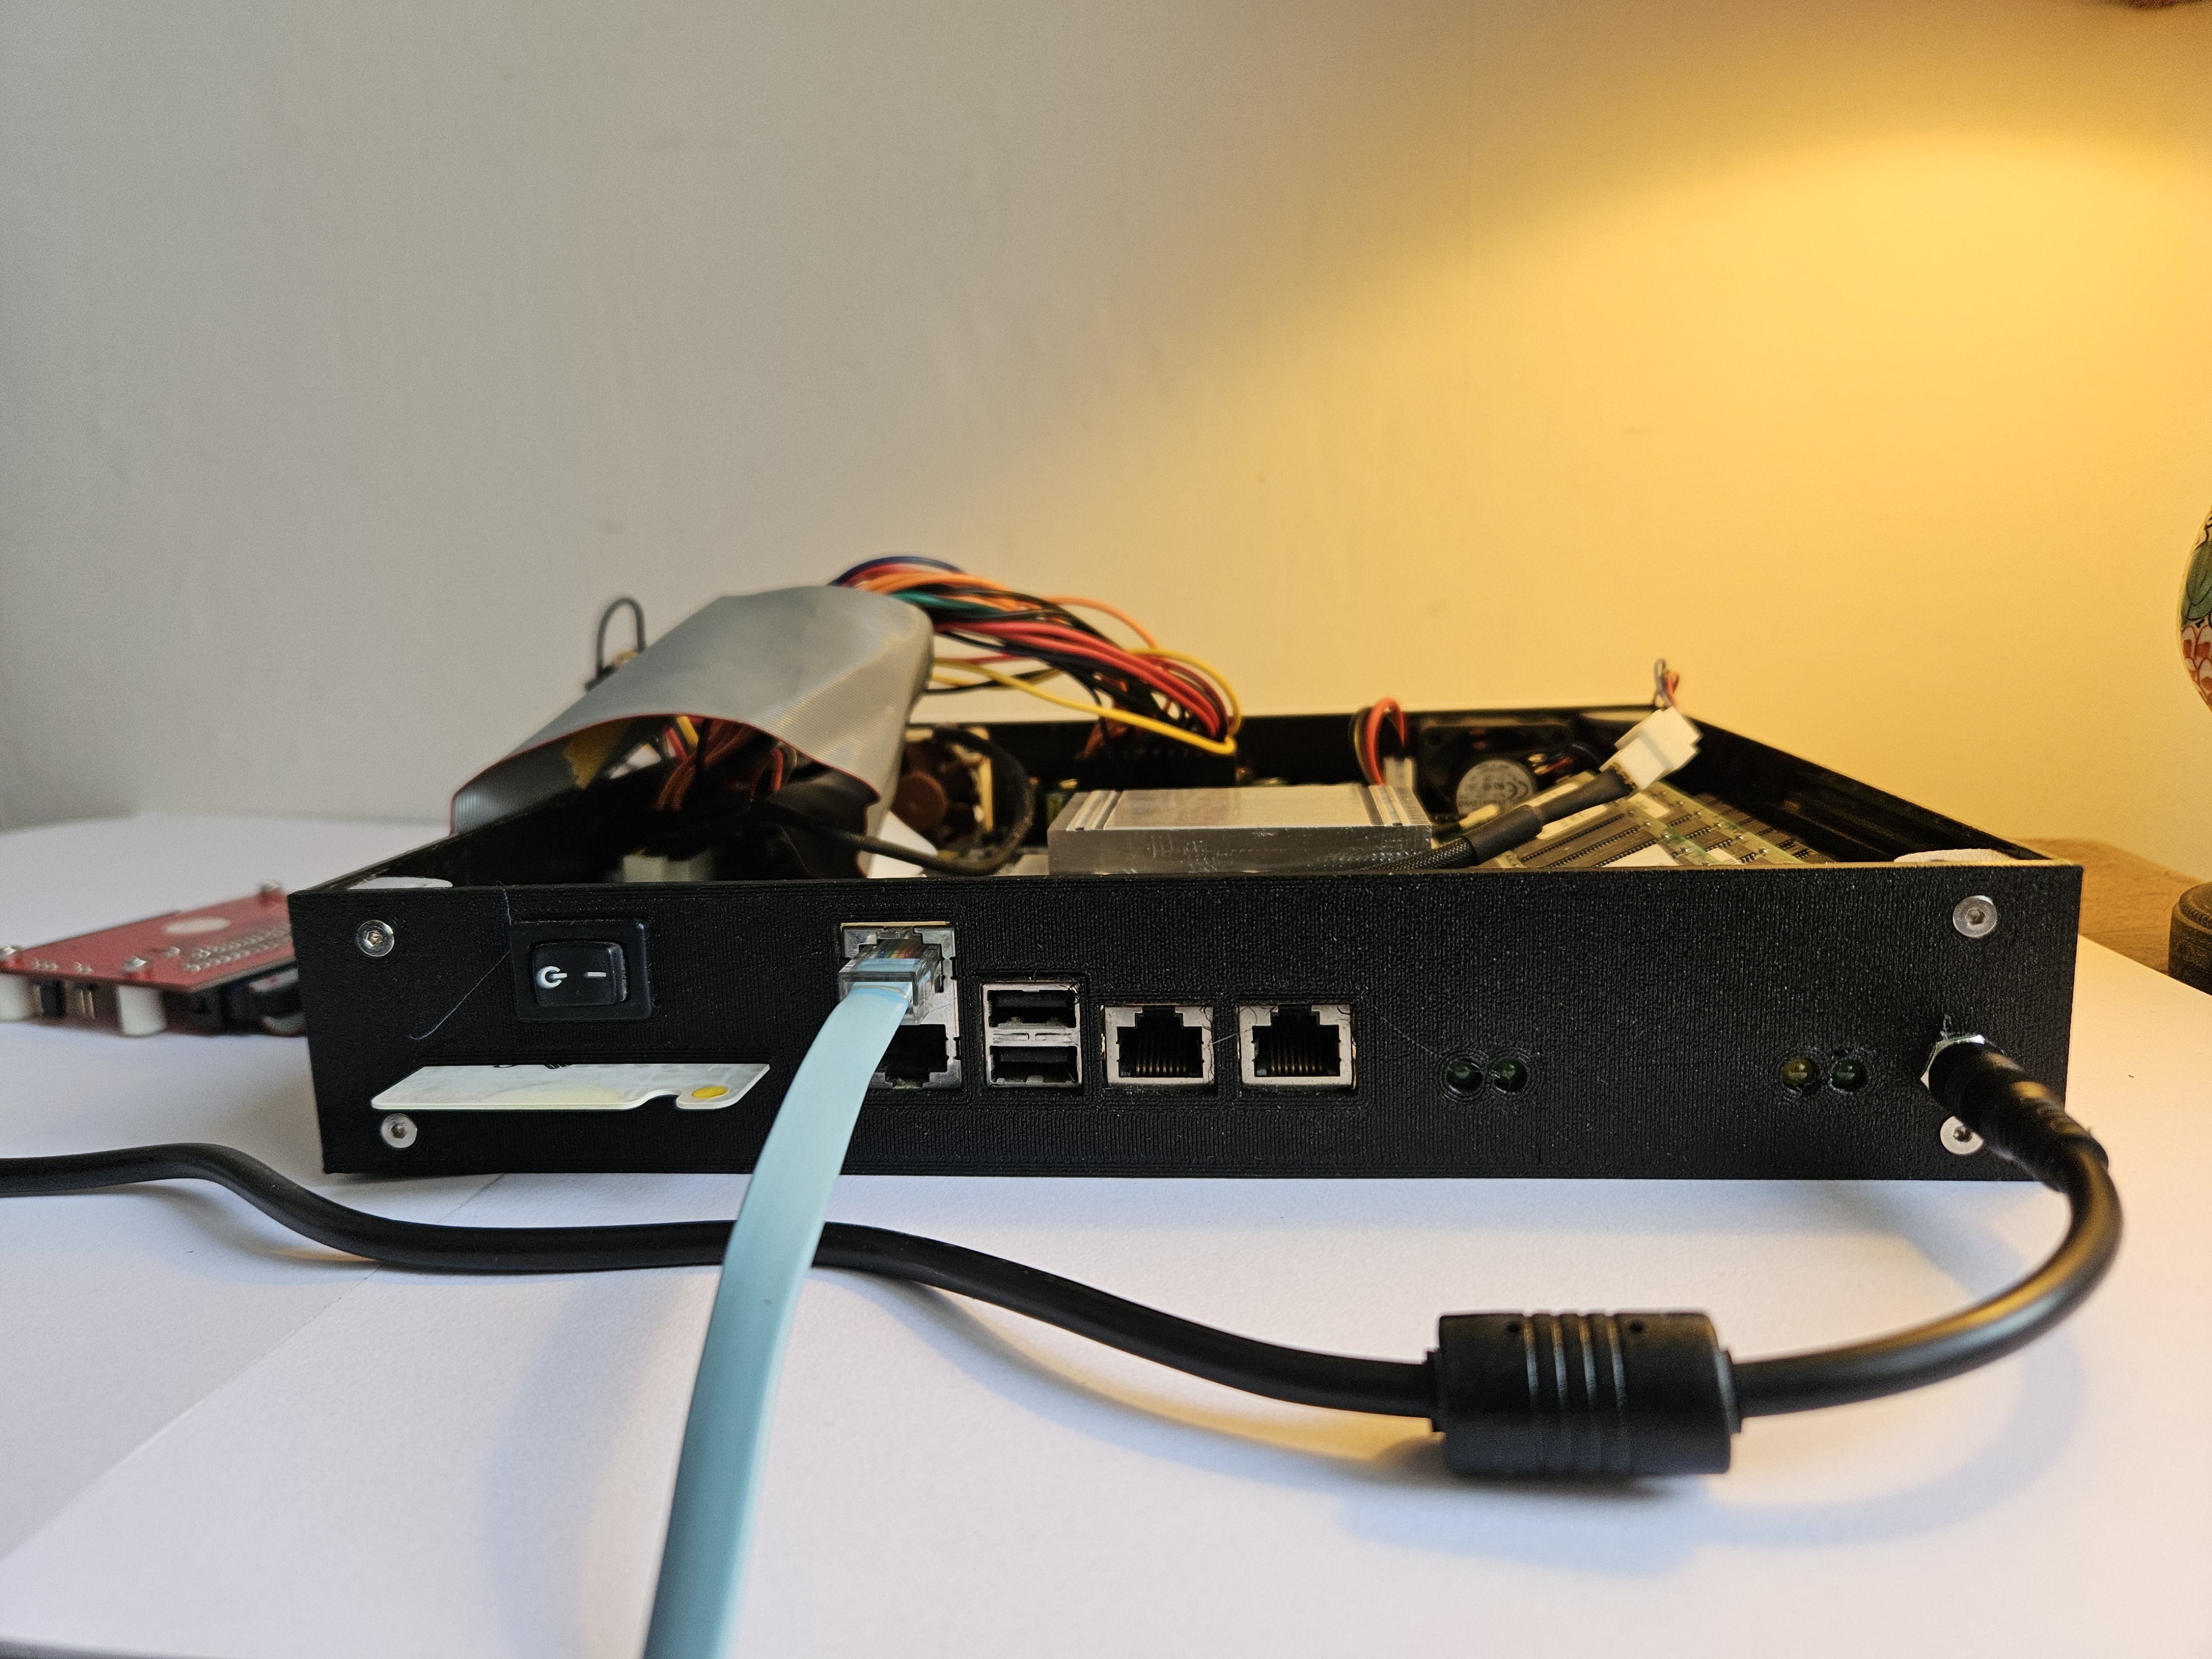
Upper RJ45 serial console (LOM) on the Sun V100 rear panel
A SPARC of Life!
The serial connection settings are the common 9600 baud, no parity, one stop bit and full duplex mode (should be the default of your preferred software).
Because I’m lazy, I’m using good old screen but you could use something else like minicom.
screen /dev/ttyUSB0
You should see something like the following when plugging in the server, or at least a lom> prompt:
LOMlite starting up.

CPU type: H8/3437S, mode 3
Ram-test: 2048 bytes OK
Initialising i2c bus: OK
Searching for EEPROMs: 50(cfg)
I2c eeprom @50: OK
i2c bus speed code 01... OK
Probing for lm80s: none
Probing for lm75s: 48
System functions: PSUs fans breakers rails gpio temps host CLI ebus clock

LOMlite console
lom>
LOM event: +0h0m0s LOM booted
lom>
Switching Between ok>/OS & lom> Prompts
By default the Serial Port is shared between the lom> prompt and the main server ok (Open Firmware)/OS shell prompt.
Here are a few useful instructions from Sun documentation to navigate between these:
There are three prompts.

  ok>   -------------------- (normal prompt when the OS is not running)
  lom>  -------------------- (available whether OS is running or not)
  #     -------------------- (the OS prompt)

To move between the "ok>" prompt and the "lom>" prompt, type:
  ok> #.      There must be less than 1 second between the "#" and "."
  lom>        ------>      This is the prompt you get

To move between the "lom>" prompt and the "ok>" prompt type:
  lom> console
Factory EEPROM Reset
I initially had issues getting to Open Firmware. In its past life, it seems this server was configured to not share LOM and tty on the same serial port.
I was getting LOM access via the upper port all right, but the Open Firmware/OS on the lower port remained silent.
lom> break
Console not shared.

lom> console -f
Console not shared.
I settled on attempting a factory reset, but it proved somewhat challenging. I tried to use procedures like this one, without luck.
I also tried using the bootmode -u and console -f flags, again, without luck.
I was about to give up when I stumbled upon this email from a former Sun employee. (Thanks Mr. Andy for posting this on a random mailing list 16 years ago, the Internet is truly amazing sometimes).
So, as indicated by this mail, I ran the following commands to reset the eeprom:
lom> set extra-cmds on

Extra commands are reserved for SUN service personnel.
Unauthorised use invalidates machine service warranty.

lom> eepromreset

lom> reset -l
And bingo, I was in business.
I was getting the ok> prompt and could switch back and forth between lom> and ok>
However, when trying to boot net, I was getting:
ok boot net
Fast Data Access MMU Miss
The following reset seems to have solved the issue:
ok set-defaults
Setting NVRAM parameters to default values.
ok reset-all
I’m kind of curious which other magic commands are available.
Open Firmware
Open Firmware is the Forth-powered (a fun little language) boot firmware used by Sun servers and other non‑x86 platforms from that period, like PowerPC Macs and IBM POWER servers. FYI, Sun had its own implementation: OpenBoot.
Useful Commands
Here are a few useful commands:
Main help:
ok help

Enter 'help command-name' or 'help category-name' for more help
(Use ONLY the first word of a category description)
Examples:  help select   -or-   help line
    Main categories are:
[...]
System and boot configuration parameters
[...]
nvramrc (making new commands permanent)
Sub-help (note: need to use lowercase):
ok help system

devalias                 - Display all device aliases
devalias <name> <value>  - Create or change a device alias
printenv      Show all configuration parameters
                numbers are shown in decimal
setenv <name> <value>   Change a configuration parameter
         changes are permanent but only take effect after a reset
   Examples:
     setenv input-device ttya         - use ttya input next time
     setenv screen-#rows 0x1e         - use 30 rows of display ( hex 1e )
     setenv boot-device net           - specify network as boot device
     setenv auto-boot? false          - disable automatic boot
set-defaults    Revert to factory configuration
See also: nvramrc
List device aliases (boot devices):
ok devalias

dload                    /pci@1f,0/ethernet@c:,
net0                     /pci@1f,0/ethernet@c
net                      /pci@1f,0/ethernet@c
cdrom                    /pci@1f,0/ide@d/cdrom@3,0:f
disk3                    /pci@1f,0/ide@d/disk@3,0
disk2                    /pci@1f,0/ide@d/disk@2,0
disk1                    /pci@1f,0/ide@d/disk@1,0
disk0                    /pci@1f,0/ide@d/disk@0,0
[...]
Get the current environment variables:
ok printenv

auto-boot?            true                           true
watchdog-reboot?      false                          false
diag-file
diag-device           net                            net
boot-file
boot-device           disk0                          disk net
local-mac-address?    false                          false
net-timeout           0                              0
ansi-terminal?        true                           true
screen-#columns       80                             80
screen-#rows          34                             34
silent-mode?          false                          false
Set the boot device (persistent):
ok setenv boot-device disk0
boot-device =         disk0

ok reset
One-time boot of another device:
ok boot net
Netboot & OS Install
Open Firmware on these machines is able to boot over the network a bit like PXE.
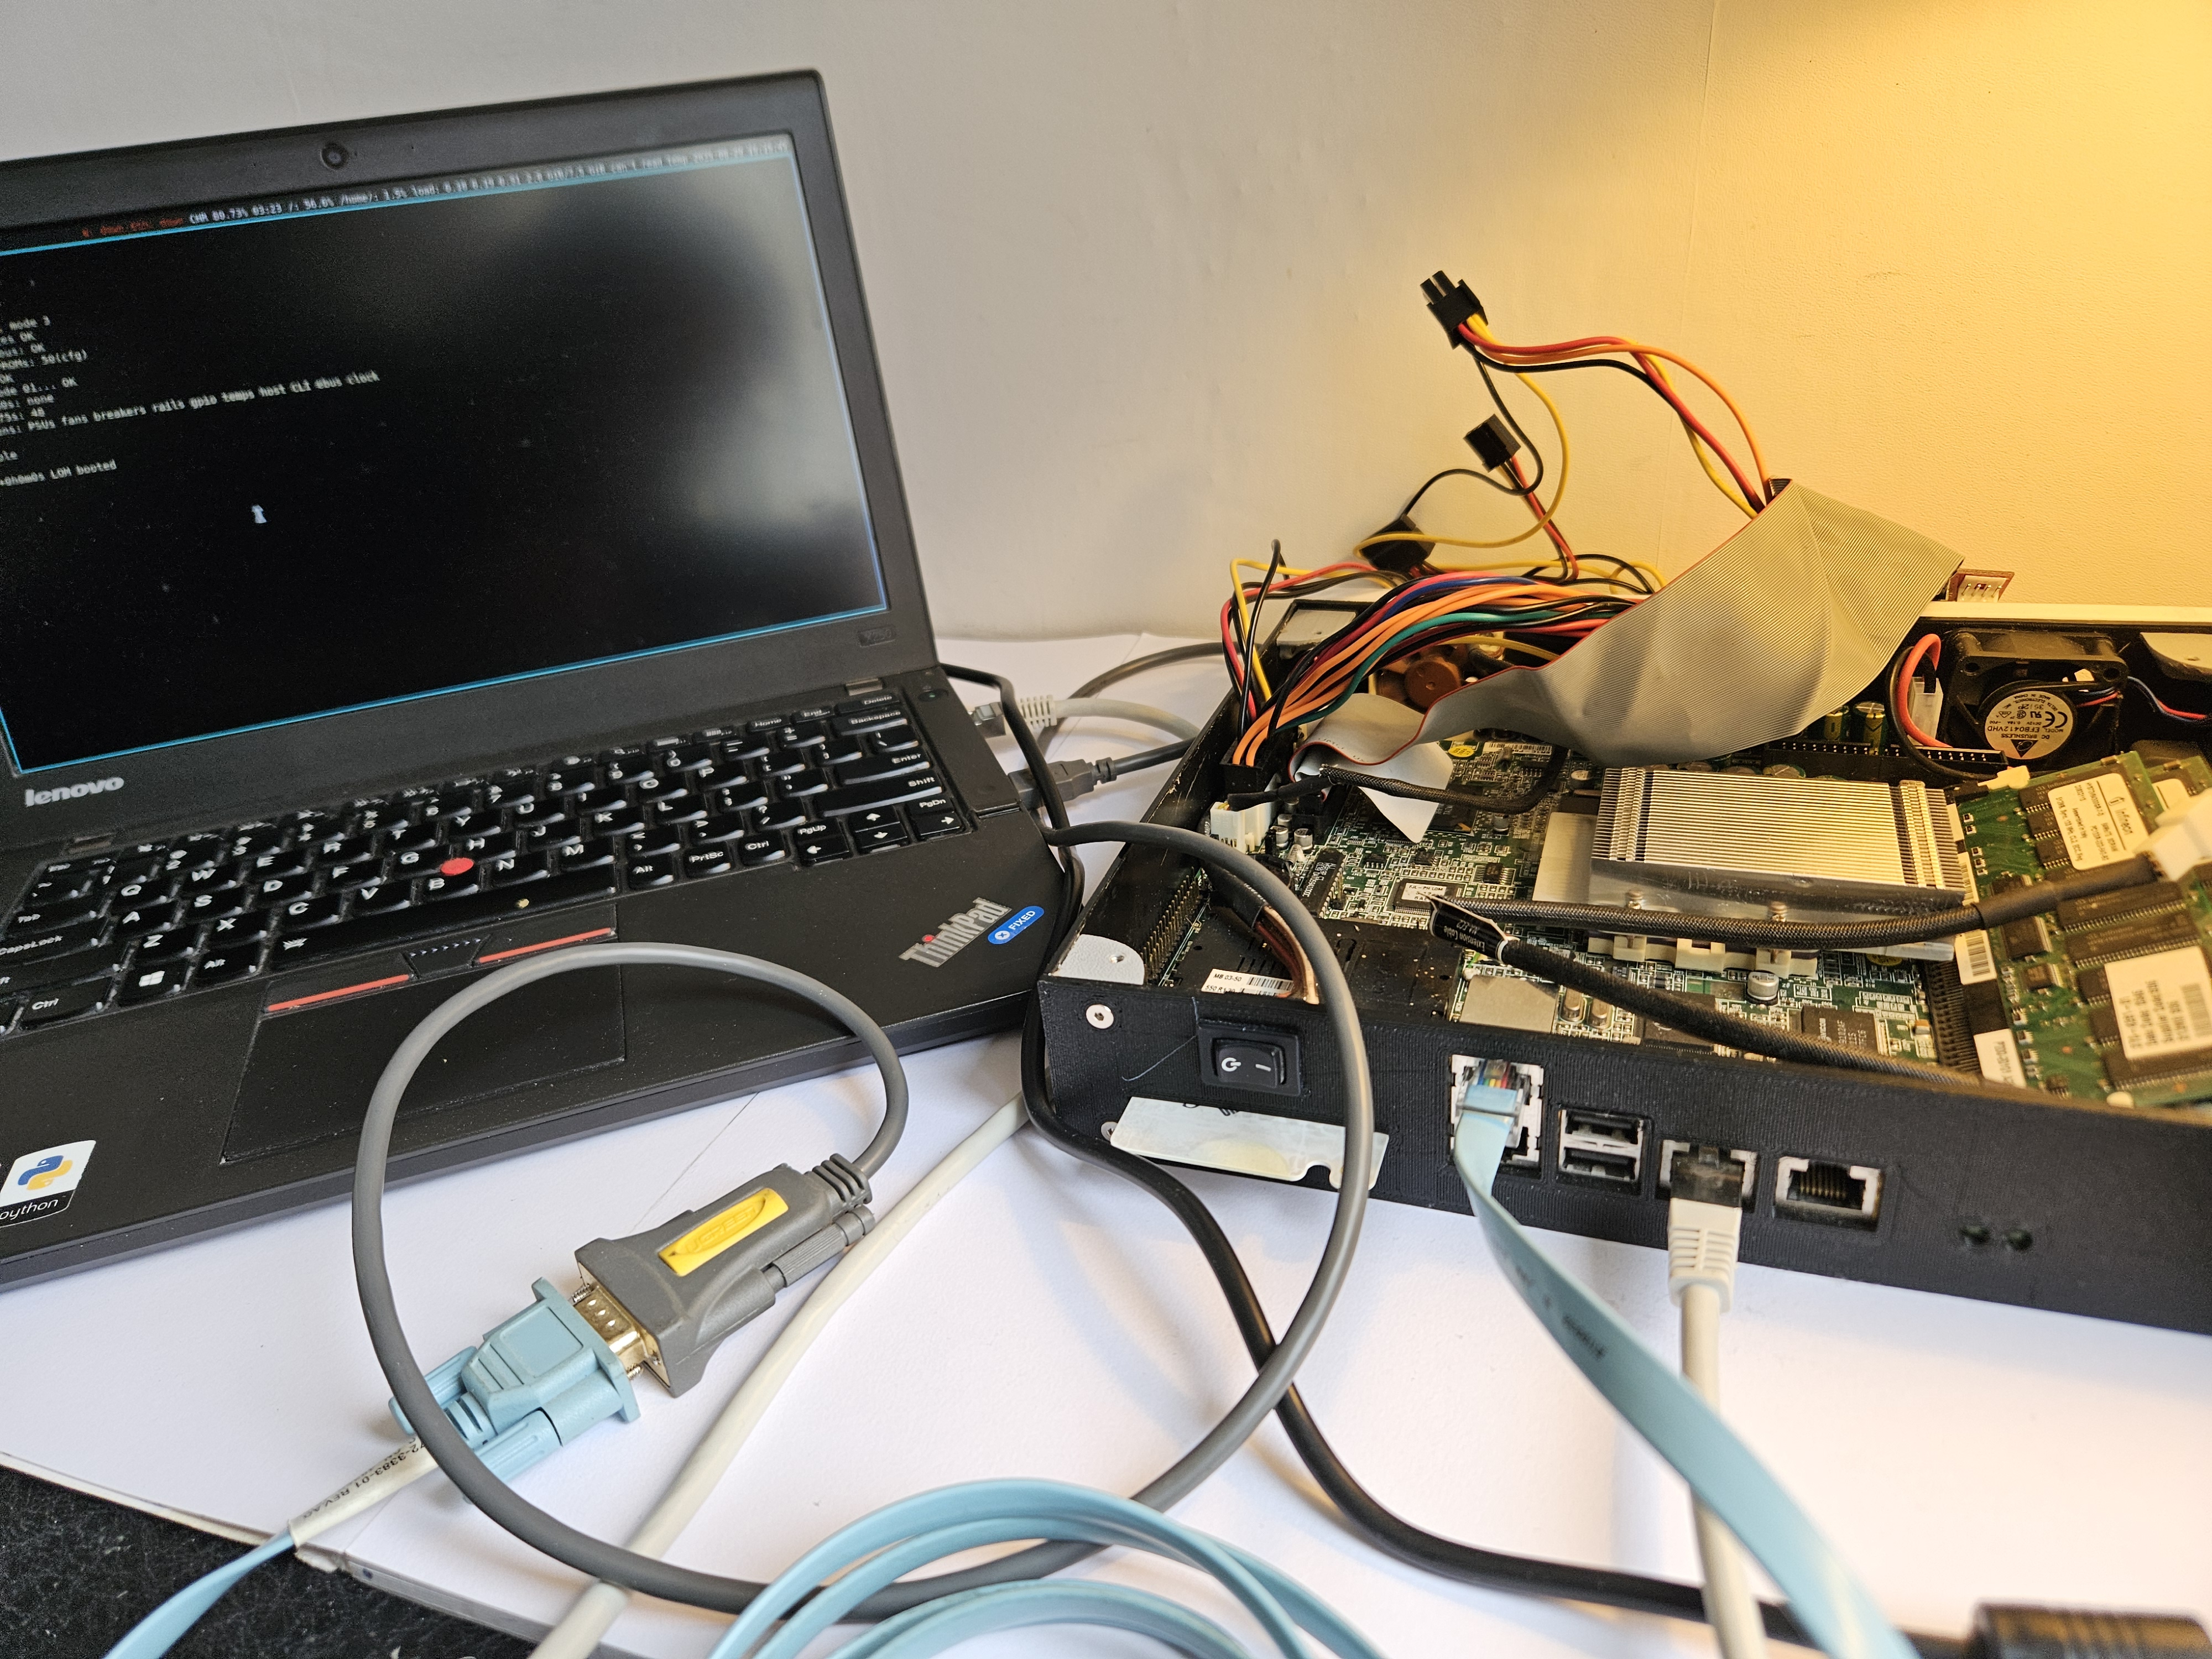
Ad‑hoc netboot lab setup for Open Firmware testing
The major difference is the lack of DHCP support: it instead relies on RARP (static MAC -> IP mapping).
Also, the netboot server needs to be on the same LAN subnet (or plugged directly into) as our cute Sun server. And the netboot server must also be a TFTP server hosting the boot file at a set location (derived from the IP we give to our Sun server).
Netboot Server Setup - The Annoying & Legacy Way
Let’s set up a netboot server (Debian/Ubuntu based) as our Sunny God intended.
First, get a root terminal:
# pick your poison
sudo -i
# or
su -
Install the necessary software:
apt install atftpd rarpd
# Set Server NIC & IPs
export BOOT_SERVER_NIC=enp0s25
export SUN_V100_IP=172.24.42.51

# Must be .150 (?)
export BOOT_SERVER_IP=172.24.42.150
Download & put the boot image in the correct TFTP location (IP address in hex):
cd /srv/tftp/
wget https://technically.kakwalab.ovh/files/ofwboot.kakwa.test

# calculate the file name expected by Open Firmware (IP address in hexadecimal)
arg="`echo ${SUN_V100_IP} | sed 's/\./ /g'`"
img_name=`printf "%.2X%.2X%.2X%.2X\n" $arg`

# create hardlink to it
ln -f ofwboot.kakwa.test ${img_name}
Start the TFTP server:
systemctl start atftpd.service
Set the server IP:
ip addr add ${BOOT_SERVER_IP}/24 dev ${BOOT_SERVER_NIC}
Launch rarpd in the foreground:
rarpd -e -dv ${BOOT_SERVER_NIC}
From the LOM connected console, start the V100:
# Set bootmode to ok/ofw prompt
# Note: if nothing is installed, defaults to boot net anyway
lom> bootmode forth
lom> reset
# if necessary
lom> poweron
After a few minutes, you should get the following prompt:
LOM event: +3h36m30s host power on
Aborting startup sequence because of lom bootmode "forth".
Input and output on ttya.
Type  fexit  to resume normal startup sequence.
Type  help  for more information
ok
From the ok> prompt, enter the following to initiate netbooting:
ok boot net
Timeout waiting for ARP/RARP packet
You should see log messages like on your rarpd server:
rarpd[16222]: RARP request from 00:03:ba:5b:ae:b3 on enp0s25
rarpd[16222]: not found in /etc/ethers
Replace with your MAC address:
export SUN_V100_MAC="00:03:ba:5b:ae:b3"

# Normalize MAC (uppercase, no colons)
MAC_UPPER=$(echo "$SUN_V100_MAC" | tr '[:lower:]' '[:upper:]')
MAC_NOPUNCT=$(echo "$MAC_UPPER" | tr -d ':')

# Generate a hostname for rarp & ethers/hosts mapping
# Note: could be any name, just avoid collisions
HOSTNAME="sparc-${MAC_NOPUNCT}"

# Make sure ethers file exists
touch /etc/ethers

# Add to /etc/ethers if not already present
grep -q -F "$MAC_UPPER $HOSTNAME" /etc/ethers || \
    echo "$MAC_UPPER $HOSTNAME" | sudo tee -a /etc/ethers

# Add to /etc/hosts if not already present
grep -q -F "$SUN_V100_IP $HOSTNAME" /etc/hosts || \
    echo "$SUN_V100_IP $HOSTNAME" | sudo tee -a /etc/hosts
After a while, the server should get an IP and retrieve the boot file:
Boot device: /pci@1f,0/ethernet@c  File and args:
27a00 >> kakwa's OFW BOOT 1.29
Using RARP protocol: ip address: 172.24.42.1, netmask: 255.255.0.0, server: 172.24.42.150
TFTP IP address: 172.24.42.150
Fast Data Access MMU Miss
It works! Not sure if we have created Paradise or Hell, however…
Netboot Server Setup - The Modern & Masochistic Way
In truth, I’m an atheist, I don’t believe in God, even the Sunnier ones.
And why is that? Well, this setup is really messy, and I’m kind of sorry if you read through it… or worse, if you actually tried to implement it. Also, spoiler, for our NetBSD/OpenBSD netbooting target, even more services are required.
So I’ve committed blasphemy and created my own all-in-one Go netboot server directly providing the RARP + TFTP combo (plus, spoiler, also BOOTP + NFSv2 + HTTP).
I must confess I’ve sinned even more by letting the twin d(a)emons Claude & ChatGPT do most of the work, especially the network protocol implementation. So, expect a few bugs.
On top of that, this netboot server is, by design, very limited. It only provides a single bootstrap path/set of boot files and should only be used within a dedicated LAN segment. Don’t rely on this server if you are still bootstrapping hundreds of SPARC servers like in the good old Jumpstart days. However, for the onesies/twosies like here, don’t hesitate to give it a try.
But enough about why my masochistic tendencies led me to develop a full netboot server for such a dead platform. Here’s how to set up this damn piece of software.
Building the server:
# build dependencies
sudo apt install golang git make

# clone sources
git clone https://github.com/kakwa/ofw-install-server
cd ofw-install-server/
make

# check the help
./ofw-install-server -h
If required, setup your nic
# NIC & IP to use for the boot server
export BOOT_SERVER_NIC="enp0s25"
export BOOT_SERVER_IP="172.24.42.150"

# Configure the NIC if necessary
sudo ip addr add "${BOOT_SERVER_IP}/24" dev "${BOOT_SERVER_NIC}"
Also, optionally, make the deploy server a router:
export WAN_NIC="wlp3s0"

echo 1 > /proc/sys/net/ipv4/ip_forward
iptables -F
iptables -t nat -F
iptables -A FORWARD -i ${BOOT_SERVER_NIC} -s ${BOOT_SERVER_IP}/24 -j ACCEPT
iptables -A FORWARD -i ${WAN_NIC} -d ${BOOT_SERVER_IP}/24 -j ACCEPT
iptables -t nat -A POSTROUTING -o ${WAN_NIC} -j MASQUERADE
iptables -t nat -A POSTROUTING -o ${WAN_NIC} -j MASQUERADE
Start the server with the TFTP & RARP module enabled:
# Retrieve something to boot:
wget https://technically.kakwalab.ovh/files/ofwboot.kakwa.test

# Start the server
sudo ./ofw-install-server -iface "${BOOT_SERVER_NIC}"  -rarp \
    -tftp -tftp-file ./ofwboot.kakwa.test
Netbooting Debian 6
Just for reference, here is how to get and netboot the last working Debian installer:
# Recover the boot.img file from the netboot installer `.deb` package.
wget https://archive.debian.org/debian/pool/main/d/debian-installer-netboot-images/debian-installer-6.0-netboot-sparc_20110106.squeeze4.b6_all.deb
mkdir debtmp && dpkg-deb -x *.deb debtmp/
find ./debtmp/ -name 'boot.img' -exec cp {} ./boot-debian-6.img \;
rm -rf -- debian-installer-6.0-netboot-sparc_20110106.squeeze4.b6_all.deb ./debtmp/

# Start the server with the Debian boot image
sudo ./ofw-install-server -iface ${BOOT_SERVER_NIC}  -rarp \
    -tftp -tftp-file ./boot-debian-6.img
From there, you should be able to install Debian 6, albeit with a few headaches like pointing to the archive.debian.org repository or handling expired GPG keys.
Note: there is a Debian 7 version of the installer, but it kernel-oopsed on me.
*BSD == More Netboot Setup…
For NetBSD/OpenBSD, this is “slightly” more complex than the Debian case:
- Open Firmware first RARPs & TFTP‑loads a tiny second‑stage loader (
ofwboot.net). - That loader then speaks BOOTPARAMS and/or BOOTP to learn its IP and the NFS root path
- It then mounts that root over good old NFSv2,
- And finally loads the kernel & ramdisk from there.
Yes: RARP + TFTP + BOOTP + NFSv2 on the same LAN segment…
Oh, and to add a bit of fun, NFSv2 is kind of obsolete (removed from Debian since 2022-03-13 in nfs-utils 1:2.6.1-1~exp1).
But once again, with a bit of vibe coding and a few tweaks, we are able to add these services to our custom netboot server.
OpenBSD Install
In the end, I opted for NetBSD so I didn’t fully install OpenBSD. But given I managed to start the installer, I’m fairly confident I would be able to install it if needed.
Also, just for kicks, given all the services we have in our netboot server, I’ve taken the liberty to add one last bit: an HTTP server to serve an OpenBSD autoinstall configuration file.
Lastly, it’s worth mentioning that the OpenBSD version of ofwboot.net gave me quite a lot of headaches. I never quite managed to feed it the NFS server IP and file path/name given by BOOTP (typo? bug? wrong BOOTP option? magic values?).
I also tried to tweak the OpenBSD ofwboot.net, but without luck. If you want to give it a try, the code is available here and can be built under Linux (see README.md instructions). I also tried to make it use RARP and TFTP for the second boot stage instead of NFS+BOOTP.
In the end, I chose to use the NetBSD’s ofwboot.net version for both NetBSD and OpenBSD and it seems to work fine. FYI, both versions come from the same source, but the NetBSD one seems marginally more modern.
But enough said, here’s the setup:
# Tweak it to the latest versions
export OPENBSD_VERSION="7.7"
export NETBSD_VERSION="10.1"

# If you want to try your luck with the OpenBSD ofwboot.net
# wget "https://ftp.openbsd.org/pub/OpenBSD/${OPENBSD_VERSION}/sparc64/ofwboot.net"

# Recover bootloader from NetBSD
wget https://cdn.netbsd.org/pub/NetBSD/NetBSD-${NETBSD_VERSION}/sparc64/installation/netboot/ofwboot.net
# Recover OpenBSD install RamDisk
wget "https://ftp.openbsd.org/pub/OpenBSD/${OPENBSD_VERSION}/sparc64/bsd.rd"
# Recover an autoinstall file
wget https://raw.githubusercontent.com/kakwa/silly-sun-server/f881b5427f1b103411285ac169dbb102ad37f874/misc/openbsd-install.conf
Start the install server:
sudo ./ofw-install-server -rarp -tftp -tftp-file ./ofwboot.net -bootp -nfs -nfs-file ./bsd.rd -http -http-file ./openbsd-install.conf
NetBSD Install
So in the end, I finally settled on installing NetBSD:
Recover & prepare the files:
# Tweak it to the latest version
export NETBSD_VERSION="10.1"

wget "https://cdn.netbsd.org/pub/NetBSD/NetBSD-${NETBSD_VERSION}/sparc64/installation/netboot/ofwboot.net"
wget "https://cdn.netbsd.org/pub/NetBSD/NetBSD-${NETBSD_VERSION}/sparc64/binary/kernel/netbsd-INSTALL.gz"
gunzip netbsd-INSTALL.gz
Start the server:
sudo ./ofw-install-server -rarp -tftp -tftp-file ./ofwboot.net -bootp -nfs -nfs-file ./netbsd-INSTALL
One Last Bit
And then I just did this final tweak in the ok prompt to make it boot on disk persistently:
ok setenv boot-device disk0
reset
Not sure why the default boot-device config (disk net) didn’t work. Maybe the disk dev alias was missing?
But frankly, by this point, I could not care less.
This cute little Sun server is finally working!
A Bit of NetBSD SysAdmin
I will not delve too deep into software configuration as this is not a blog post about NetBSD administration.
But nonetheless, I will present a few useful bits.
Hardware Monitoring
netra-x1# envstat
               Current  CritMax  WarnMax  WarnMin  CritMin  Unit
[admtemp0]
   internal:    37.000   95.000                    -55.000  degC
   external:    58.000  105.000                    -55.000  degC
[lom0]
  Fault LED:     FALSE
     Alarm1:     FALSE
     Alarm2:     FALSE
     Alarm3:      TRUE
SSHD
Enabling SSH access, because network access is nicer than serial:
grep -q '^sshd=YES' /etc/rc.conf || echo 'sshd=YES' >> /etc/rc.conf
/etc/rc.d/sshd start
NTP
On such an old server, the clock might be out of date, leading to weird errors:
# Force synchronization
ntpdate 2.netbsd.pool.ntp.org

# Enable NTP
grep -q '^ntpd=YES' /etc/rc.conf || echo 'ntpd=YES' >> /etc/rc.conf
/etc/rc.d/ntpd start
Getting A Package Manager
Install pkgin:
pkg_add https://cdn.NetBSD.org/pub/pkgsrc/packages/NetBSD/`uname -m`/`uname -r`/All/pkgin
Update the index:
pkgin update
Search for packages:
pkgin search neovim
Install packages:
pkgin install neovim
Configuring Services
Now that I had a working server, I used Ansible to configure a bunch of services:
- Reverse proxies + basic auth for my 3D printers & other IoTs.
- A bit of public static hosting.
- A personal FreshRSS instance.
I managed to get everything working, but my NetBSD experience has been a bit rough around the edges.
In particular, the binary packages are rather inconsistent, and frequently have dependencies/linking issues or are really outdated.
I had to fall back on pkgsrc quite often, and well… compiling big projects like php or nginx feels like torturing this poor old machine.
Given I’ve already angered our Machine Overlords (sketchy story involving compiling Gentoo on a PowerBook Titanium 1 GHz… inside a fridge), it’s something I would prefer to avoid.
If you are in the same SPARCy boat, I’ve published the resulting binary packages here.
But I managed to make everything work in the end. Here are my Ansible playbook & roles if you are interested. They are a bit buggy and not fully idempotent, but they can help you get started if you want to work on NetBSD, even with other CPU architectures.
Lastly, as a final touch, I thought it was fitting to host a copy of the Sun System Handbook on this server.
Conclusion
It was a long project, lasting several months. The CAD/case design part in particular took me quite a while, which was not unexpected given my starting skills. Yet, I’m really pleased with the result, and I’ve learned a lot, from drawing properly constrained sketches to part assembly. Firing up FreeCAD is no longer a dreaded experience, and I’m now much quicker at designing accurate parts.
It also led me to numerous side projects, like playing with USB-C PD, rebuilding my Ender 3 with a new board and Klipper, or learning about laser cutting.
On the software side, it made me discover NetBSD and in the end, I managed to host everything I wanted on this small server.
I hope this cute thing will serve me well enough for at least a few years. SPARC may be on borrowed time, and things may get harder and harder to run, but I trust the NetBSD folks to not drop it soon (they have a reputation to uphold after all).
In any case, I had a lot of fun doing this project, and I hope you had some of this fun reading it.
Prepare for trouble, make it double
Links
- Part 1/3 - Introduction.
- Part 2/3 - Hardware.
- This project’s git (scripts, programs & 3D models).
- Sun’s V100 Handbook Documentation.
- Misc Sun/Oracle’s PDFs.
- Sun’s LOMlite2 Documentation.
- DogeMicroSystems Wiki.
- Various blogs like: Eerie’s blog post 1 and 2, Scott Alan Miller’s series or Andrew Rawlins’s solar-powered Sun V100.
- NetBSD netboot & SPARC64 specific install instructions
- OpenBSD diskless & SPARC64 specific install instructions
- Obligatory Clabretro’s video.